MBCRO Transfers Document
  • Installation
    • Server Requirements
    • Prepare Database
    • Installation System
    • License and Support
    • Setting up cron job
    • Users Accounts
  • Dashboard
  • Support Center
    • Contacts
    • Tailor
  • Users & Roles
    • Users
    • Roles
    • Users Reports
  • Transfers
    • Vehicle Classes
    • Locations
    • Add Vehicles
    • Vehicle Extras
  • Bookings
    • Invoices
    • Track & Print
    • Invoices Reports
  • Frontend
    • Home Control
    • Menus
    • Slides
    • Sections
    • Sections Services
    • Destinations Cities
    • Tailor Made
    • Why Choose Us
    • How It Works
    • Reviews
    • Partners
    • Faqs
    • Frontend Pages
    • Pages
    • Copyrights
  • Blog
    • Posts
    • Categories
  • Settings
    • General Settings
    • Translations Editor
    • Currencies
    • Media
  • Support
    • Contact Admin
  • System Tools
    • System Backup
    • Database
    • Bread
    • Compass
  • Change Log
    • Version 1.0
  • Thank You!
 
MBCRO Transfers Doc
  • Docs »
  • Support
  • Articles
  • Demo

    Server Requirements

    MBCRO Transfers System and Laravel framework has a few system requirements. All of these requirements are satisfied by the Laravel Homestead virtual machine, so it's highly recommended that you use Homestead as your local Laravel development environment.

    However, if you are not using Homestead, you will need to make sure your server meets the following requirements:

    • PHP version 7.3 and later
    • BCMath PHP Extension
    • Ctype PHP Extension
    • Fileinfo PHP extension
    • JSON PHP Extension
    • Mbstring PHP Extension
    • OpenSSL PHP Extension
    • PDO PHP Extension
    • Tokenizer PHP Extension
    • XML PHP Extension
    • Apache Mod_rewrite

    Create Database

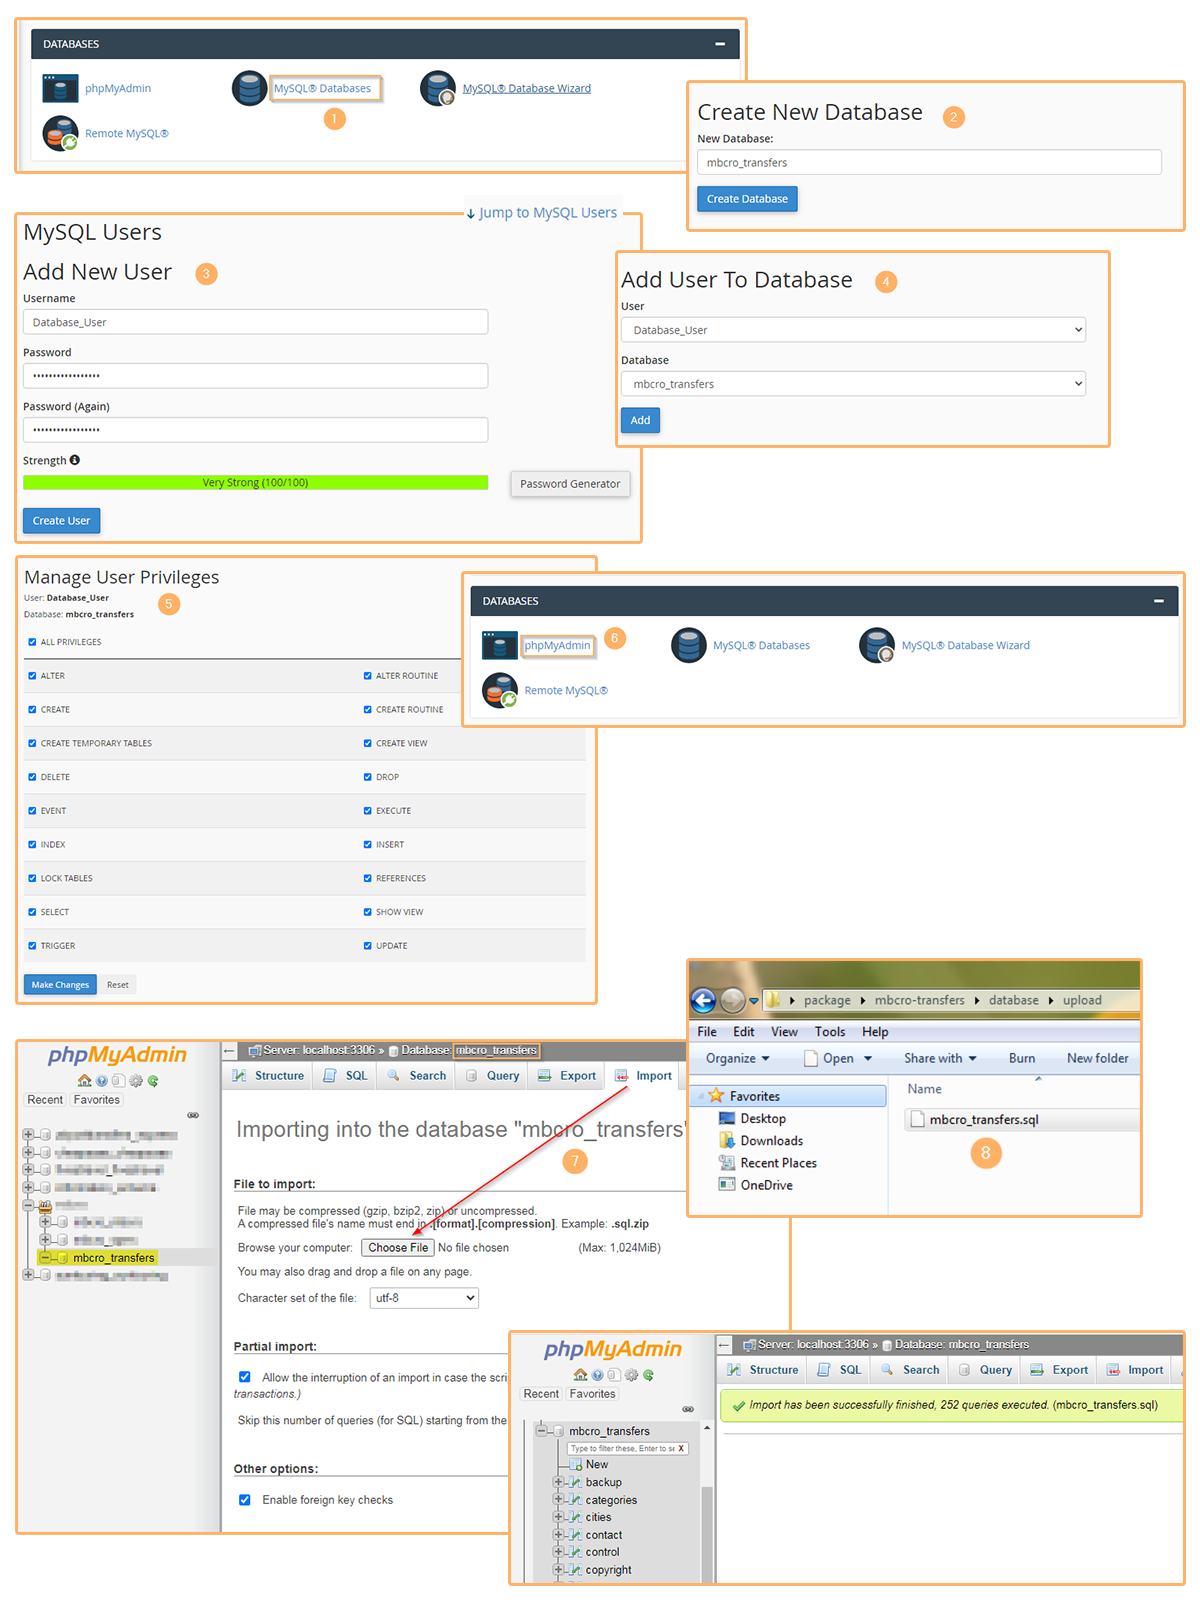
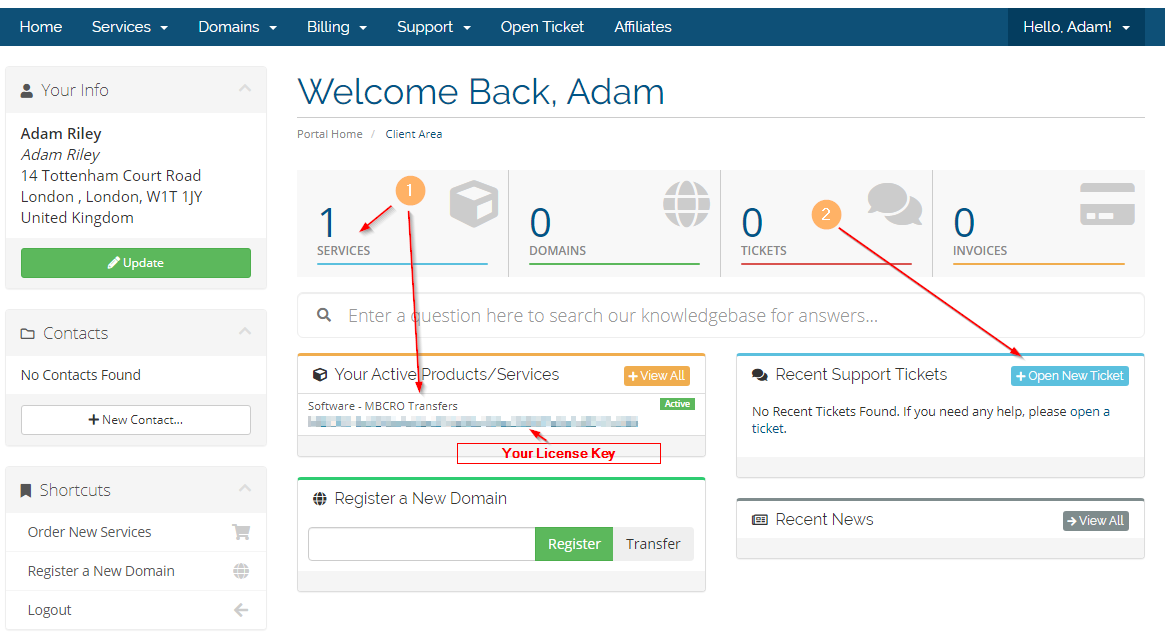
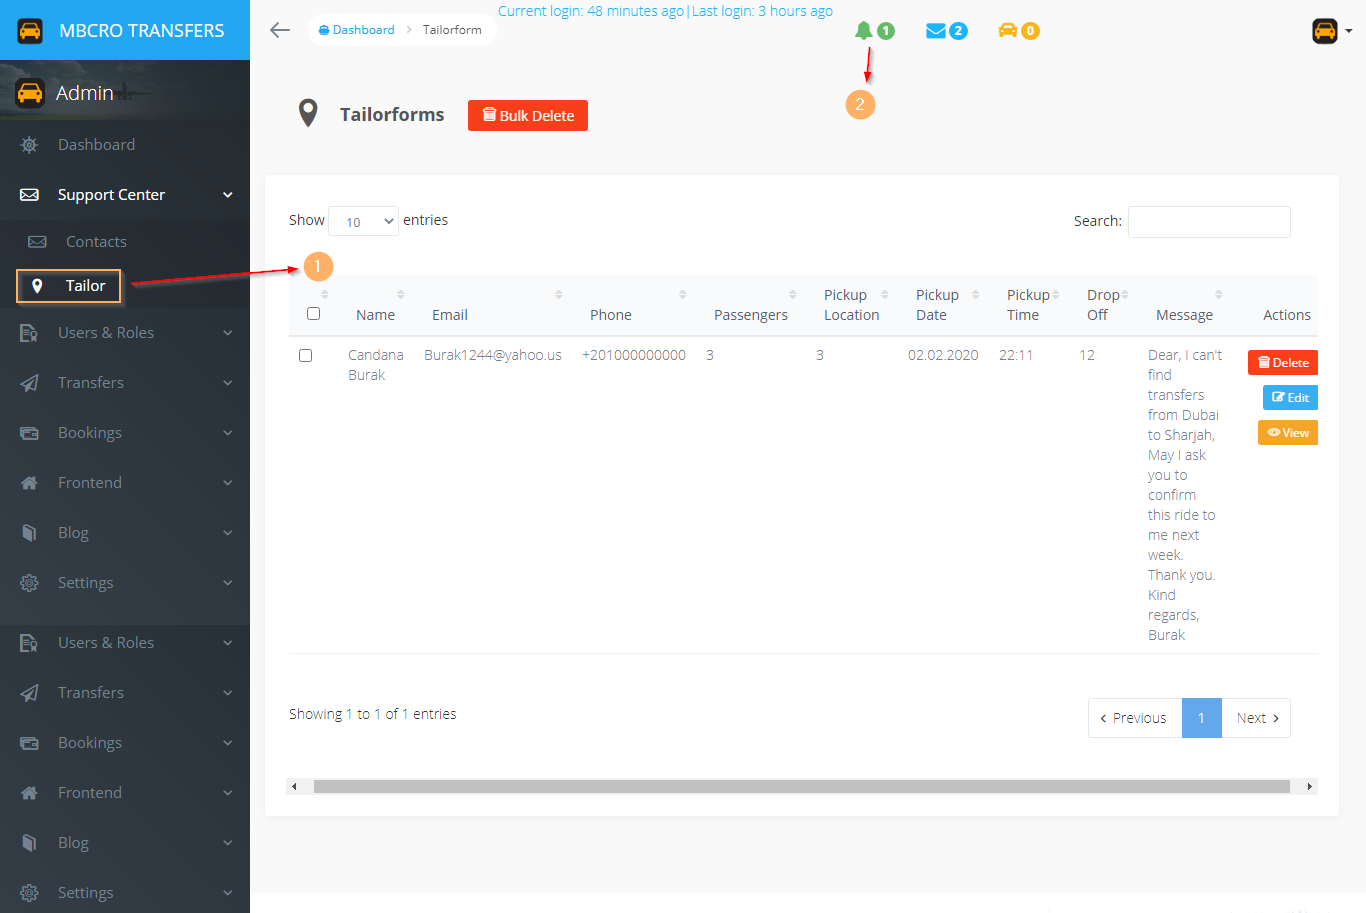
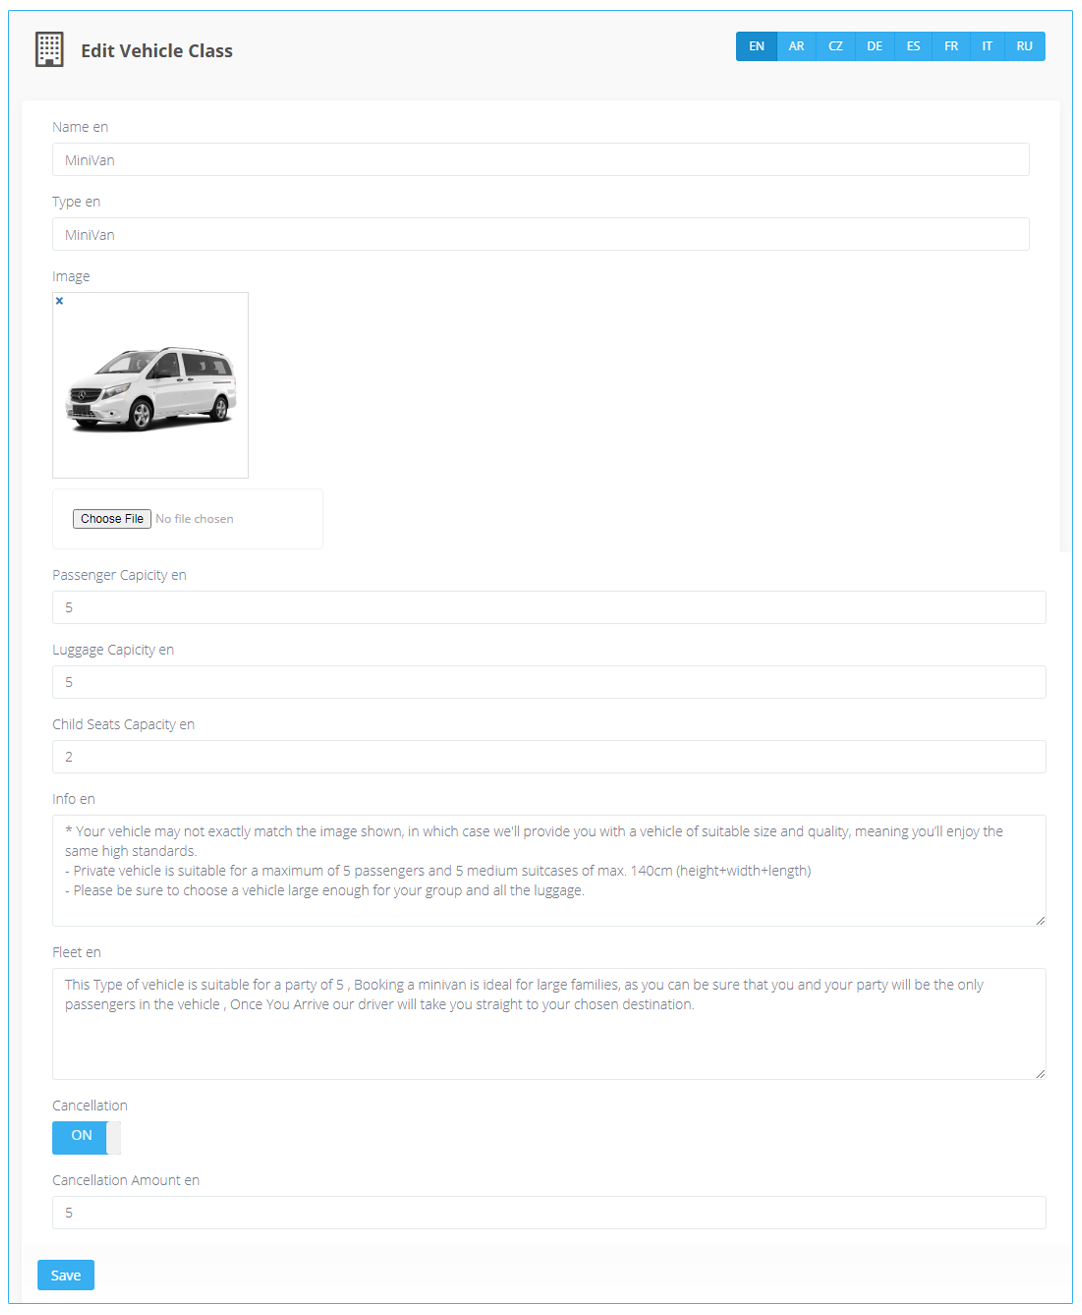
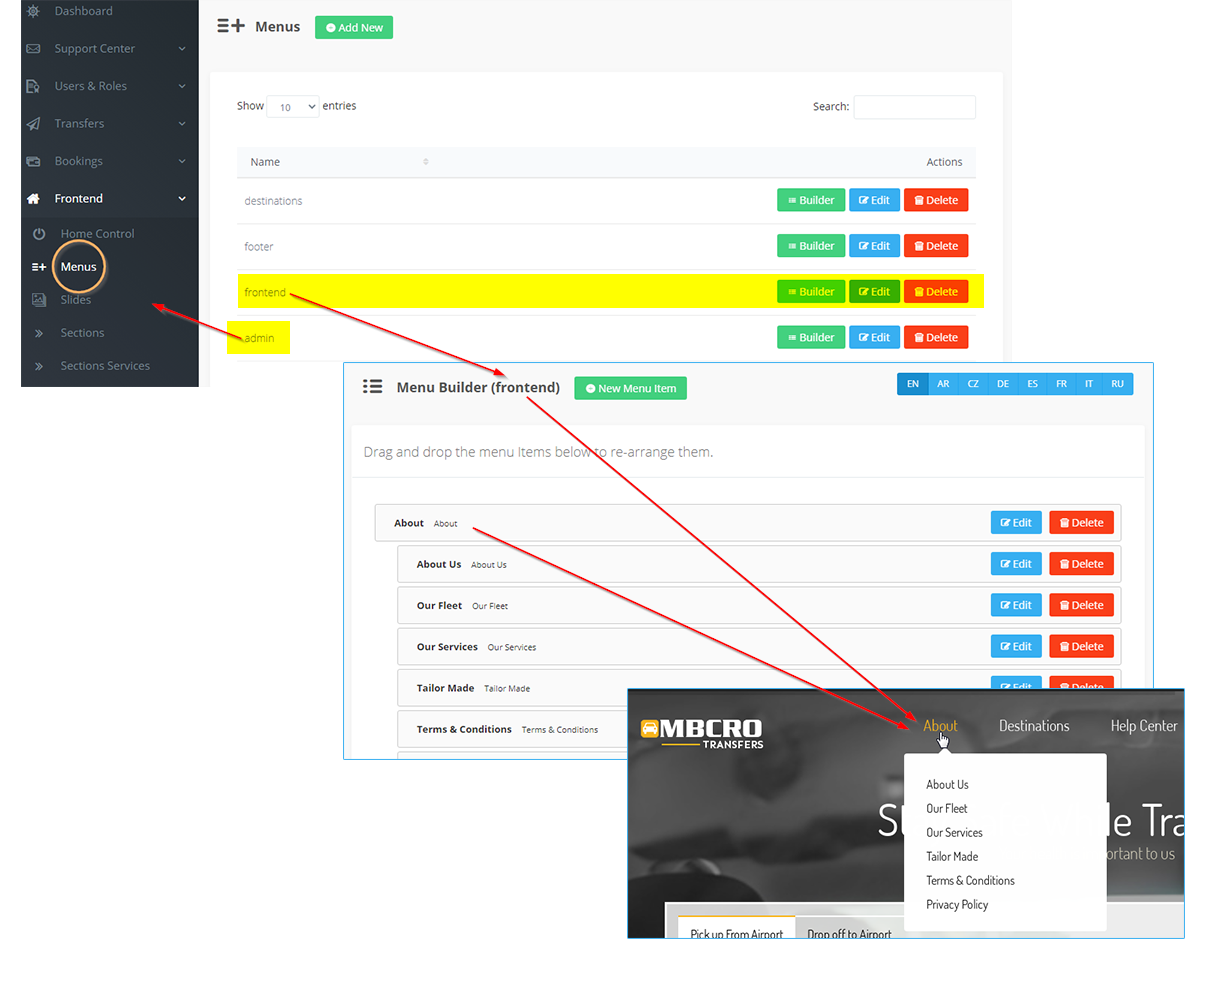
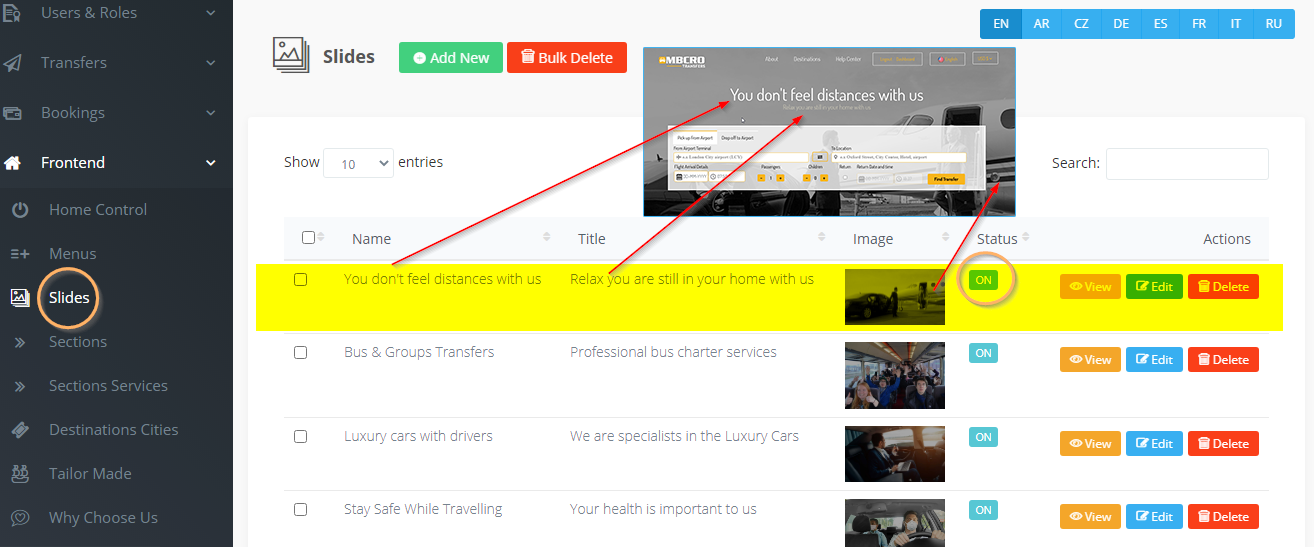
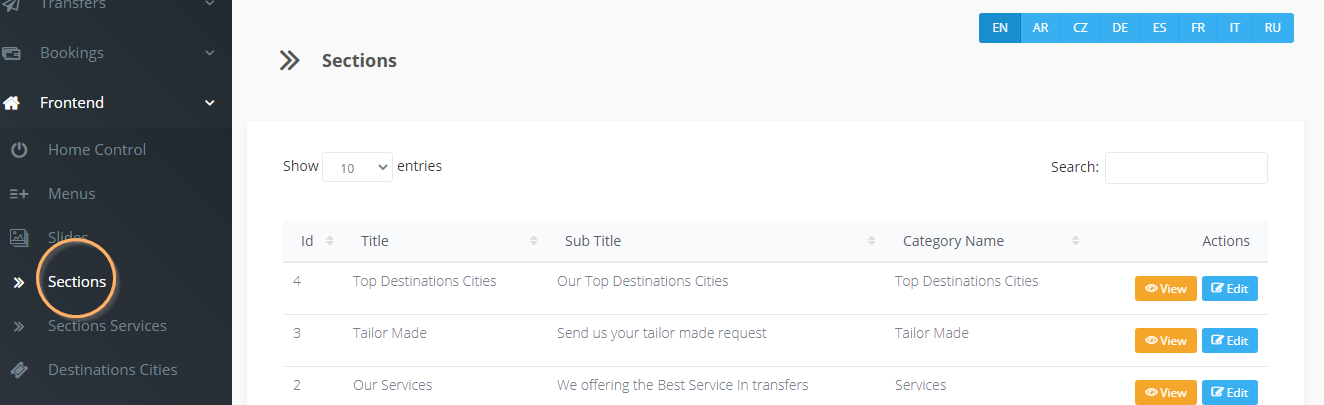
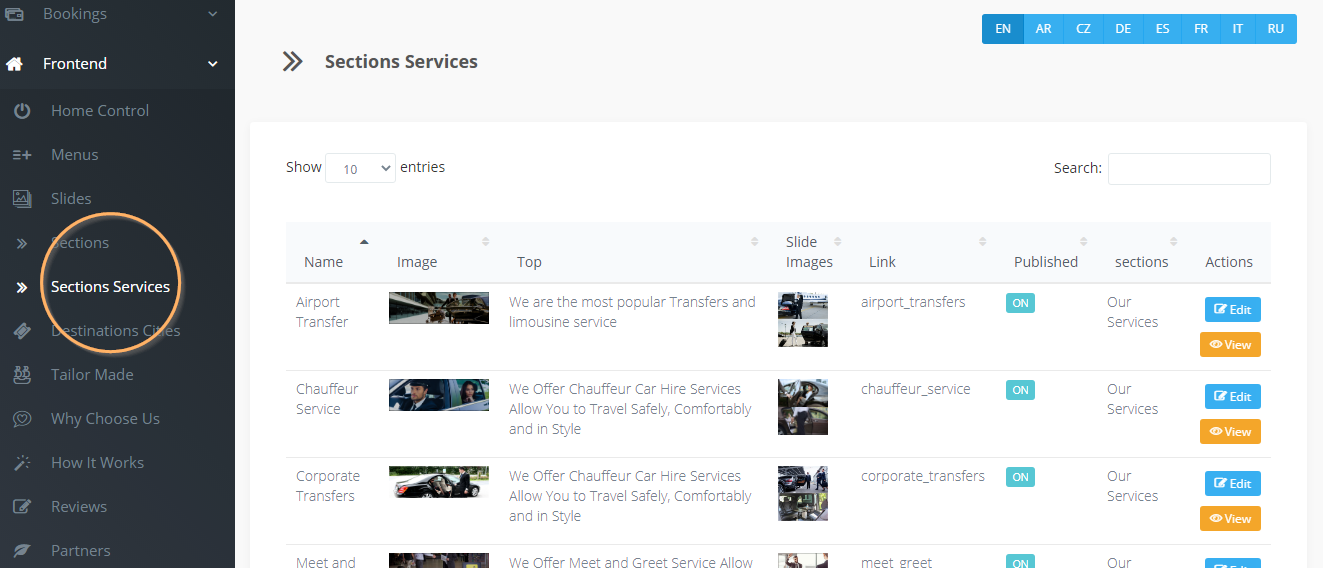
    Create a MySQL Database

    Step 1 – Log into cPanel, Under Databases, click MySQL Databases.

    Step 2 – In the New Database field, type a name for the database. and then Click Go Back.

    Step 3 – Click Jump to MySQL Users in the top-right corner of the page and under Add New User
    - Enter a username
    - Enter a password in the Password field.
    * For help generating a strong password, click the Generate Password button.
    - Retype the password in the Password (Again) field.
    - Click Create User.

    Step 4 – Go to Add User To Database and Select User which you created and select database from Database selection and press Add.

    Step 5 – From the MySQL Account PRIVILEGES screen, select the privileges you wish to grant the user, or select ALL PRIVILEGES. and then Click Make Changes.

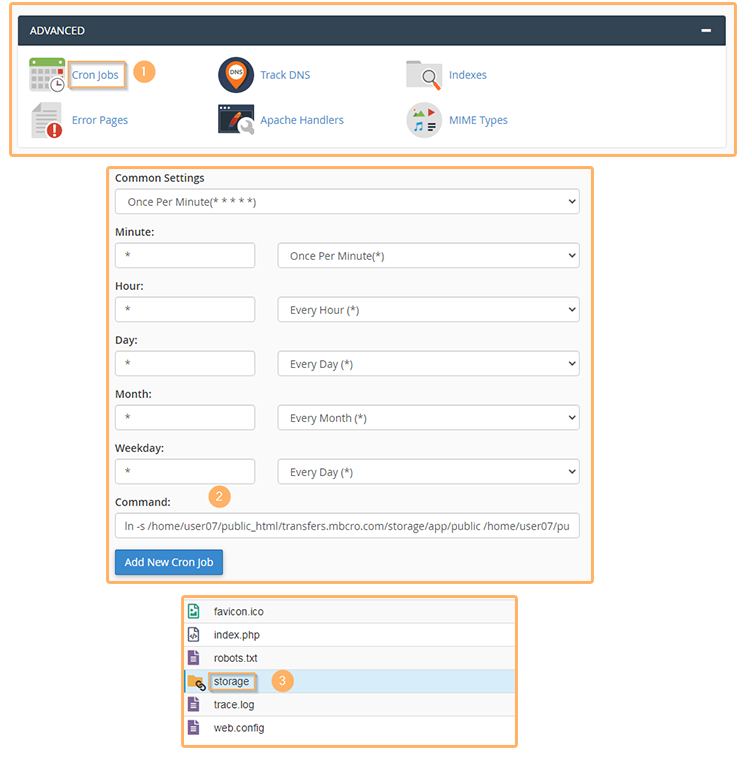
    Step 6 – Importing the database, please back to cpanel home page and select phpMyAdmin.

    Step 7 – in phpMyAdmin open your database and select Import then Choose File.

    Step 8 – navigate to the upload folder and select mbcro_transfers.sql and press Go to import the database.

    Now you should see the successful message of importing all tables to your new database

    Installation System


    Please follow the steps below to install MBCRO Transfers system .

    Step 1 – Unzip the downloaded package from Codecanyon. Find inside package folder mbcro-transfers.zip file.

    Step 2 – Upload mbcro-transfers.zip to your hosting by File Manager

    Step 3 – Unzip mbcro-transfers.zip to your hosting root folder "Domain" or sub folder "Sub domain"

    Step 4 – Edit .ENV file and update file all necessary info related to your server

    Step 5: – Fill Environment Configuration file .env with required information

    Now Browse your website domain EX. yourdomain.com or transfers.mbcro.com. You will notice that the browser redirect you to the license page

    Please Enter your license which you got from your account in mbcro.com

    Accounts Information

    Log into your Web site account by typing yourdomain.com/dashboard, replacing "yourdomain" with the actual domain you own.

    Admin Account:

    Username: admin@mbcro.com / Pass: admin12345

    Customer/User:

    Username: user@mbcro.com /Pass: User1234

    License and Support

    - After your purchased the software from codecanyon please register your account in mbcro.com to get the license and the support.
    - If you already has an account please Login to your account.

    1. Show the license Key which connected to Services in your customer dashboard.
    2. Show the number of tickets you created. You can open new ticket by pressing + Open New Ticket.

    Setting up cron job

    cron job is important for creating symbolic link for storage. Which is related to all your files system uploads.
    Step 1 – Open cPanel home page, scroll down to the Advanced section and click the Cron Jobs icon.
    Step 2 – Scroll down to the Add New Cron Job section. You can either select from the Common Settings drop down menus or fill out your own custom values. Fill out the form as follows:
    - Common Settings: Select a preset interval for your cron job to run Once Per Minute
    - Enter the below command in the Command field and click Add New Cron Job.

    ln -s /home/user07/public_html/transfers.mbcro.com/storage/app/public /home/user07/public_html/transfers.mbcro.com/public/storage

    Note: Don't forget to replace the below info
    user07 = cpanel user account
    transfers.mbcro.com = your domain name

    Step 3 – Navigate to your website directory and make sure that /storage folder has been created.

    Dashboard

    No 1 : Admin Menu

    No 2 : Dashboard Data and Time , Current login session , Last login session you used the system.

    No 3 : Dashboard Transfers Notifications, Contact Notifications , Tailor Notifications .

    No 4 : User Profile

    No 5 : Dashboard Statistics - Number of Users, Roles, Posts, Pages, Airports, Locations, Vehicles and the Total of earning comparing to number of Invoices.

    No 6 : Chart Statistics show Total Earning every month and Number of Invoices

    No 7 : Chart Statistics show total balance comparing to Top Pickup and Top Dropoff locations.

    No 8 : Chart Statistics show transfers invoices status - In Progress, Completed, Cancelled.

    No 9 : Map Statistics show orders Country name and Number of Invoices from every country.


    Contacts

    Dashboard > Support Center > Contacts

    To check the Customers Contacts Emails. Navigate to Dashboard > Support Center > Contact

    1- Show the emails with sender details Name, Email, Phone, Booking Reference ID, Message, IP, Country, City, location Latitude & Longitude, Time of receiving the message.

    2- Number of Unread Notifications Emails.


    Tailor Made 

    Dashboard > Support Center > Tailor

    To check the Customers Tailor Made requests. Navigate to Dashboard > Support Center > Tailor

    1- it Show the tailor made request details Name, Passengers numbers, Pickup Location, Pickup Date, Pickup Time, Drop Off Time, Request Message, IP, Country, City, location Latitude & Longitude, Time of receiving the request.

    2- Number of Unread Tailor Made Notifications Requests.


    User management 

    Dashboard > Users & Roles > Users

    Users are people who use system including admins and every user can have Role limitations.


    Users with admin role can Add, Edit and View, Delete otheres users. Adding, Edit users information include :

    - Name

    - Last Name

    - E-mail

    - Password

    - Default role (Group)

    - User Avatar photo

    Roles management 

    Dashboard > Users & Roles > Roles

    Role Group is permission group give the ability to users members the access to specific Module, page, controller

    After adding Role Group you can assign the suitable

    Permission to users by enable or disable the ability to Browse, Read, Edit, Add, Delete from specific module.

    Users Reports 

    Dashboard > Users & Roles > Users Reports

    This features in Admin Dash Board enable Admin users from creating users report by date range from specific date to another date and exporting it as :

    1: Excel File

    2: PDF File

    3. CSV File


    Vehicle Classes

    Dashboard > Transfers > Vehicle Classes

    With Vehicle Classes section you can Add, Edit, View, Edit, all information for Vehicles


    The below screen shot show the kind of information which you can add, edit with Vehicle Classes: Name, Type, Image, Passenger Capicity, Luggage Capicity, Child Seats Capacity, Vehicle Info, Cancellation Status, Cancellation Amount

    Locations

    Dashboard > Transfers > Locations

    In this section you can control the Airports, Locations, which it appear in the search engin in the main page.


    Add Airport

  • Location : The name of the Airport
  • Top Location : NO: Mean It's Airport
  • Type : Select Airport from the menu.
  • Parent : Select None from the menu to specify that this is Airport without parent.

  •  

    Add Location:

  • Location : The name of the location
  • Top Location : YES Mean adding this location to the Top Location in the search engine.
  • Type : Select Location from the menu.
  • Parent : Select Parent Airport from the menu to specify that this location is connected to this specific location.

  • Add Vehicles

    Dashboard > Transfers > Add Vehicles

    In this section you can add Vehicle Class and connect the right location to this Vehicle.

  • Press Add New and select Vehicle Class from the drop down menu.
  • Then press Save to save the relation in the database.

  • After you add the Vehicle Class you can Add destinations which you want to this vehicle

  • Add Destination:
    • From Location: select the parent Airport
    • To Location: select the location you want to connect to this airport
    • Distance: Specify the distance by KM from this airport to this location
    • Time: Specify the time by H: Hour or min:minutes from this airport to this location
    • Price: Specify the Price of this transfer depends on the distance and time and the type of this vehicle.

  • Vehicle Extras

    Dashboard > Transfers > Vehicle Extras

    Vehicle Extras are the Additional Services which you want the users see and add while they are making the booking


    To add or edit vehicle extras please fillthe require information.

  • Title : The name of the additional extra
  • Info : The description of the additional extra
  • Image : The photo for the additional extra

    Invoices 

    Dashboard > Bookings > Invoices

    All transfers order save here in this section as invoices

    to be available for review for both Admins and users.

    1. In Progress: Show that invoice in pendding and the transfer is waiting action.

    2. Complete : Show that invoice is finished and this transfer already made.

    3. Cancelled : Show that invoice is cancelled by admin or by user request.

    You can change the status for any invoice by editing it by pressing the Edit button.
    Then from drop down menu select the suitable status.

    Track & Print 

    Dashboard > Bookings > Track & Print

    In this section you as admin or user depends on your account role group, you can track any of yours invoices and print it or download it as PDF file at any time:

    1. Track My Bookings: Provide the ability to search for specific invoice by Invoice-Number and E-mail.

    2. Track Last Booking : Provide the ability to find last invoice made by the logged user.

    No invoices records under your email : Mean that you don't have invoices made by your user account.

    Screen shot from User Dashboardshow the track of last booking

    After you press Manage My Booking you will see the results of booking

    1. Click here to print a receipt with additional details: Provide the ability to print invoice directly to your phiscal printer.

    2. Download Inovice PDF : Provide the ability to download the PDF invoice to your device.

    Invoices Reports 

    Dashboard > Bookings > Invoices Reports

    This features in Admin Dash Board enable Admins users from invoices by date range from specific date to another date and exporting it as :

    1: Excel File

    2. CSV File

    Invoices Reports

    Preview data: Show the live exported data before you export it as demo


    Home Control 

    Dashboard > Frontend > Home Control

    Home Control enable you from enable/disable every section in the home page and changing the names and titles for every section:

    • Name: The name of the section
    • Title: the title for the section
    • Published: On-> enable the section & Off->disable the section

    Menus 

    Dashboard > Frontend > Menus

    Menu Builder enable you from add, edit, delete the menu items in the system:

    • admin: Dashboard admin menu
    • frontend: frontend and website page menu
    • footer: website and home page footer menu
    • destinations: website footer top destinations menu

    Slides 

    Dashboard > Frontend > Slides

    Dashboard Slides enable you from add, edit, delete frontend sliders images and information:

    • Name: slide name.
    • Title: slide title.
    • Image: slide image.
    • Status: On-> enable slide & Off->disable the slide

    Sections 

    Dashboard > Frontend > Sections

    Dashboard Sections enable you from editing some sections informations:

    • Title: section title.
    • Sub Title: section sub title.
    • Category Name: section category name.

    Sections Services 

    Dashboard > Frontend > Sections Services

    Here you can edit all serrvices name, contents, images, availability, ..etc:

    • Name: service name.
    • Image: service main Image.
    • Top: service top description.
    • Slide Images: service page slides. You should leave it without images or you add minimum 2 images for every slide.
    • Contents: your service contents and information.
    • Link: service URL.
    • Published: you can choose between enabling or disabling the service.
    • sections: the parent section for your service. Where it should be Our Services from the menu.

    Destinations Cities 

    Dashboard > Frontend > Destinations Cities

    Here you can add, edit, delete destinations cities:

    • Name: city name.
    • Image: city main image.
    • Top: top description for the city.
    • Slide Images: city slides images. You should leave it without images or you add minimum 2 images for every slide.
    • Contents: city contents and information.
    • Link: city URL.
    • Published: choose between enabling or disabling the city.
    • sections: the parent section for the city. Where it should be Top Destinations Cities from the menu.

    Tailor Made 

    Dashboard > Frontend > Tailor Made

    Tailor Made is a customized transfer that will be organized according to your customer wishes and demands:

    • Name: tailor made name.
    • Top: tailor made top title.
    • Head: tailor made header title.
    • Contents: tailor made explanation details
    • sections: the parent section for the tailor made. Where it should be Tailor Made from the menu.

    Why Choose Us 

    Dashboard > Frontend > Why Choose Us

    In this section you can add, edit, delete why choose us blocks:

    • Name: block name.
    • Image: block image.
    • Details: block details.
    • Published: On-> enable block & Off->disable the block

    How It Works 

    Dashboard > Frontend > How It Works

    How the system works and the page explanation for the booking service:

    • Name: section name.
    • Title: section title.
    • Step1: Step1 name.
    • Exp1: Step1 explanations.
    • Step2: Step2 name.
    • Exp2: Step2 explanations.
    • Step3: Step3 name.
    • Exp3: Step3 explanations.
    • Image: section home page image.
    • Body: How to book page contents.

    Reviews 

    Dashboard > Frontend > Reviews

    Homepage review section. you can add, edit, delete reviews:

    • Name: review site name.
    • Title: review site title.
    • Hints: review site link hint.
    • Link: review site link/URL.
    • Image: review site image/logo.
    • Published: On-> enable review site & Off->disable the review site

    Partners 

    Dashboard > Frontend > Partners

    In this section you can add, edit, delete frontend partners:

    • Name: partner name.
    • Title: partner title.
    • Image: partner image/logo.
    • Published: On-> enable partner & Off->disable the partner

    Faqs 

    Dashboard > Frontend > Faqs

    In this section you can control the faqs, questions and answers by adding, editing, deleting it:

    • Number: question number.
    • Question: the question.
    • Answer: the answer.

    Frontend Pages 

    Dashboard > Frontend > Frontend Pages

    In this section you can control the changes of about us, privacy policy, terms & conditions pages:

    • Name: page name.
    • Title: page title.
    • Body: page contents.

    Pages 

    Dashboard > Frontend > Pages

    Here you can build your custom page from pages template by adding new page and link it or use it where you want:

    • Title: page title.
    • Excerpt: short description about the page.
    • Body: the Contents of the page from text, photos, links, ..etc
    • Link: the link of the page which is consist of 2 parts /pages/title which you wrote in the title.
    • Meta Description: the description for the meta tags.
    • Meta Keywords: meta tags key words
    • Status: ACTIVE-> enable the page & INACTIVE->disable the page

    Copyrights 

    Dashboard > Frontend > Copyrights

    Dashboard Slides enable you from add, edit, delete frontend sliders images and information:

    • Copyright: your copyright words.
    • Site: your site name.
    • Link: your site link/URL.
    • Owner: the oner of the website if it's exist or just leave it blank.

Blog Posts 

Dashboard > Blog > Posts

In this section you can control posts by add, edit, view, delete posts.


Add/Edit Posts:

1. Post Title: The name of your post

2. URL slug: The URL/Link for your post, it depends on your post name but without spaces.

3. Post Content: The articles/news/contents of the post.

4. Post Status: It's on of the three post status published, draft, Pending post.

5. Post Category: The name of the category you created for sorting posts.

6. Featured: Specifying if the post will list as feature in blog page.

7. Post Image : The image/screen shot of your post

8. SEO Content - Meta Description: Search Engine Optimization meta description

9. SEO Content - Meta Keywords: Search Engine Optimization meta keywords

10. SEO Content - SEO Title: Search Engine Optimization words

11. Excerpt : Short description for your post which it appear in the blog page.

12. Author : The name of the user who wrote the post.

Blog Categories 

Dashboard > Blog > Categories

Blog Category is the group for your posts and how you want to sort your posts.


Add/Edit Category

Parent : From drop down menu you can select the parent category or you can select --None-- specify that this category is main and without parent.

Order : is a number for sorting the displaying of the categories in the blog. 1 appear in the top before 2 by ascending order

Name : The name/title of your post.

Slug : The Link/URL of your post, it's from your post name but without spaces.

    General Settings 

    Dashboard > Settings > General Settings

    • Site:
      • Site Title: the name of your site which it appear in the browser title bar.
      • Site Description: website description about your site and your services.
      • Site Logo: web site log image which it appear in the frontend pages
      • Favicon: web site icon which it appear in the browser bar.
      • Invoice Logo: the log which it appear in the orders invoices.
      • Invoice ID: the shortcut code for the invoices ex. Invoice-
      • Frontend Color: the theme color for the website. there are 4 colors to choose Blue, orange, Green, Red

    • Admin:
      • Admin Title: System admin title which it appear in the browser title bar for the admin login.
      • Admin Description: System description for admin login.
      • Admin Loader: admin log for loading pages.
      • Favicon: system admin icon which it appear in browser bar.
      • Admin Background Image: The background image for the admin login.

    • Contact:
      • Address: your business address.
      • Email: the main contact email address.
      • Email 2: second contact email address for receiving system orders emails.
      • Email 3: email address appear in contact page.
      • Email 4: email address appear in contact page.
      • Landline: landline/local phone number.
      • Phone: mobile number.
      • FAX: fax number.
      • Google Map: your business address which it appear in contact page.

    • Social Media:
      • Facebook: facebook page/group link.
      • Twitter: twitter link account.
      • Tripadvisor: tripadvisor link account.
      • Linkedin: linkedin link account.
      • Instagram: instagram link Instagram.
      • Youtube: youtube chanel link .
      • Whatsapp: whatsapp.
      • Google: google plus link account.
      • Skype : skype account name.
      • Snapchat : snapchat account name.
      • Pinterest : pinterest account name.

    • Footer Logos:
      • footer : logos, there are 7 images you can change it.

    • Languages:
      • 8 languages : On mean the language is enabled. and Off mean the language is disabled and not available for the user.

    • Payment Methods:
      • Cash for the driver : On mean the payment of cash for the driver is enable. and Off mean this methode is disabled.
      • PayPal : On mean the payment of PayPal is enable. and Off mean this methode is disabled.
      • PayFort : On mean the payment of PayFort is enable. and Off mean this methode is disabled.

    • API:
      • Fixer API: fixer API key.
      • Tawk API: tawk API link account.
      • Google Map API: Google Map API key.
      • MAILCHIMP API: MAILCHIMP API KEY.

    • Security:
      • GDPR Compliant: GDPR link.
      • Secure Booking: enable the feature of making the booking 1 day {+1d} or 3 days {+3d} before.
      • Secure Booking Dates: prevent specific dates from booking ex. 21-12-2020.

    • Email:
      • Email Configuration: add/edit email system configuration information.


    Translations Editor 

    Dashboard > Settings > Translations Editor

    –  Translations Editor: Allow you to edit system language words in 8 languages. Included but not limited to:

  • EN-> English  
  • AR->Arabic
  • CZ->Czech
  • DE->Deutsche
  • ES->Española
  • FR->Française
  • IT->Italiana
  • RU->русский
  • You can edit and translate the words to your language by click Edit -> select your language -> write the translation thr word. As described in the below screen shot.


    Currencies Manager 

    Dashboard > Settings > Currencies

    Real-time exchange rate data for more than 170 world currencies, updated every 60 seconds with Fixer API.

    Please select your currency from the below table or from Fixer Available Currencies and add the name of your currency in Name field and the currency code in the sign.

    Sign Currency Country Name Ascending
    AED United Arab Emirates Dirham
    AFN Afghan Afghani
    ALL Albanian Lek
    AMD Armenian Dram
    ANG Netherlands Antillean Guilder
    AOA Angolan Kwanza
    ARS Argentine Peso
    AUD Australian Dollar
    AWG Aruban Florin
    AZN Azerbaijani Manat
    BAM Bosnia-Herzegovina Convertible Mark
    BBD Barbadian Dollar
    BDT Bangladeshi Taka
    BGN Bulgarian Lev
    BHD Bahraini Dinar
    BIF Burundian Franc
    BMD Bermudan Dollar
    BND Brunei Dollar
    BOB Bolivian Boliviano
    BRL Brazilian Real
    BSD Bahamian Dollar
    BTC Bitcoin
    BTN Bhutanese Ngultrum
    BWP Botswanan Pula
    BYR Belarusian Ruble
    BYN New Belarusian Ruble
    BZD Belize Dollar
    CAD Canadian Dollar
    CDF Congolese Franc
    CHF Swiss Franc
    CLF Chilean Unit of Account (UF)
    CLP Chilean Peso
    CNY Chinese Yuan
    COP Colombian Peso
    CRC Costa Rican Colón
    CUC Cuban Convertible Peso
    CUP Cuban Peso
    CVE Cape Verdean Escudo
    CZK Czech Republic Koruna
    DJF Djiboutian Franc
    DKK Danish Krone
    DOP Dominican Peso
    DZD Algerian Dinar
    EGP Egyptian Pound
    ERN Eritrean Nakfa
    ETB Ethiopian Birr
    EUR Euro
    FJD Fijian Dollar
    FKP Falkland Islands Pound
    GBP British Pound Sterling
    GEL Georgian Lari
    GGP Guernsey Pound
    GHS Ghanaian Cedi
    GIP Gibraltar Pound
    GMD Gambian Dalasi
    GNF Guinean Franc
    GTQ Guatemalan Quetzal
    GYD Guyanaese Dollar
    HKD Hong Kong Dollar
    HNL Honduran Lempira
    HRK Croatian Kuna
    HTG Haitian Gourde
    HUF Hungarian Forint
    IDR Indonesian Rupiah
    ILS Israeli New Sheqel
    IMP Manx pound
    INR Indian Rupee
    IQD Iraqi Dinar
    IRR Iranian Rial
    ISK Icelandic Króna
    JEP Jersey Pound
    JMD Jamaican Dollar
    JOD Jordanian Dinar
    JPY Japanese Yen
    KES Kenyan Shilling
    KGS Kyrgystani Som
    KHR Cambodian Riel
    KMF Comorian Franc
    KPW North Korean Won
    KRW South Korean Won
    KWD Kuwaiti Dinar
    KYD Cayman Islands Dollar
    KZT Kazakhstani Tenge
    LAK Laotian Kip
    LBP Lebanese Pound
    LKR Sri Lankan Rupee
    LRD Liberian Dollar
    LSL Lesotho Loti
    LTL Lithuanian Litas
    LVL Latvian Lats
    LYD Libyan Dinar
    MAD Moroccan Dirham
    MDL Moldovan Leu
    MGA Malagasy Ariary
    MKD Macedonian Denar
    MMK Myanma Kyat
    MNT Mongolian Tugrik
    MOP Macanese Pataca
    MRO Mauritanian Ouguiya
    MUR Mauritian Rupee
    MVR Maldivian Rufiyaa
    MWK Malawian Kwacha
    MXN Mexican Peso
    MYR Malaysian Ringgit
    MZN Mozambican Metical
    NAD Namibian Dollar
    NGN Nigerian Naira
    NIO Nicaraguan Córdoba
    NOK Norwegian Krone
    NPR Nepalese Rupee
    NZD New Zealand Dollar
    OMR Omani Rial
    PAB Panamanian Balboa
    PEN Peruvian Nuevo Sol
    PGK Papua New Guinean Kina
    PHP Philippine Peso
    PKR Pakistani Rupee
    PLN Polish Zloty
    PYG Paraguayan Guarani
    QAR Qatari Rial
    RON Romanian Leu
    RSD Serbian Dinar
    RUB Russian Ruble
    RWF Rwandan Franc
    SAR Saudi Riyal
    SBD Solomon Islands Dollar
    SCR Seychellois Rupee
    SDG Sudanese Pound
    SEK Swedish Krona
    SGD Singapore Dollar
    SHP Saint Helena Pound
    SLL Sierra Leonean Leone
    SOS Somali Shilling
    SRD Surinamese Dollar
    STD São Tomé and Príncipe Dobra
    SVC Salvadoran Colón
    SYP Syrian Pound
    SZL Swazi Lilangeni
    THB Thai Baht
    TJS Tajikistani Somoni
    TMT Turkmenistani Manat
    TND Tunisian Dinar
    TOP Tongan Paʻanga
    TRY Turkish Lira
    TTD Trinidad and Tobago Dollar
    TWD New Taiwan Dollar
    TZS Tanzanian Shilling
    UAH Ukrainian Hryvnia
    UGX Ugandan Shilling
    USD United States Dollar
    UYU Uruguayan Peso
    UZS Uzbekistan Som
    VEF Venezuelan Bolívar Fuerte
    VND Vietnamese Dong
    VUV Vanuatu Vatu
    WST Samoan Tala
    XAF CFA Franc BEAC
    XAG Silver (troy ounce)
    XAU Gold (troy ounce)
    XCD East Caribbean Dollar
    XDR Special Drawing Rights
    XOF CFA Franc BCEAO
    XPF CFP Franc
    YER Yemeni Rial
    ZAR South African Rand
    ZMK Zambian Kwacha (pre-2013)
    ZMW Zambian Kwacha
    ZWL Zimbabwean Dollar

    Media Manager 

    Dashboard > Settings > Media

    Dashboard media manager allows you to view/edit/delete files from your storage .
    All files in your application will be easily accessible and will live in a single place. Compatible with local or s3 file storage.


    Contact Admin 

    Dashboard > Support > Contact Admin

    It's contact form enable logged user from sending support email to the admin.

    System Backup

    Dashboard > System Tools > System Backup

    1. Create Backup: to create full backup for the system with both database, system files to storage\app\MBCRO-Transfers location.

    2. Create database backup: To create only a copy from database to storage\app\MBCRO-Transfers location.

    3. Create files backup: To create only a copy from database to storage\app\MBCRO-Transfers location.

    4. Refresh the backup storage to get new backups information.

    5. Download the backup to your device.

    6. Delete the current backup from system storage.


    Database Management

    Dashboard > System Tools > Database

    • 1. Create New Table : To add new database table.
    • 2. View, Edit, Delete : write a detailed description about Tour
    • 3. BREAD : Browse, Edit, Delete bread.


    Add/Edit Database Table

    • 1. Table Name : The name of table inside database.
    • 2. Create model for this table? : Yes,Please to create model for this table. No Thanks to create the table without model.
    • 3. Add New Column : to add new database table Column and specify the Column options.
    • 4. Add Timestamps : to add created at and updated at to the table.
    • 5. Add Soft Deletes : to add soft delete option for this table.

    Bread Management 

    Dashboard > System Tools > Bread

    The bread system is Similar to CRUD give you the ability to Browse, Read, Edit, Add, and Delete crud/bread. You can easily add any BREAD views and functionality to any table in your database.


    Add new bread to table and configure table relationships

    Compass Management 

    Dashboard > System Tools > Compass

    The compass section will help you with resources.
    This section also has a tab where you can execute Laravel commands and another tab to view your application logs files!
    Yes, you can view your log files directly in the admin dashboard.


    Now you can run more than 107+ PHP Artisan command with arguments for every command and you get the results directly in your web dashboard as you get it in your local host, personal PC, dedicated host server.

    In Logs files tab you can review all system logs file and errors inside your system.

Thank you for used our product MBCRO Transfers 

Version 1.0 - June 24 - 2020

This is the first official release for MBCRO Transfers System

Thank you for used our product MBCRO Transfers 

Released: 24 June 2020

Made by: MBCRO Transfers Team  

Get support at: MBCRO Support Center

Request New Features by opening new features request.

We are one of the strong teams in developing Transfers Systems, However, we are also looking forward to the positive feedback as well as the contributions to build a perfect Transfers systems.

We would like to express our sincere thanks to our customers , who are companions and stick with us all the way ahead.


© Copyright 2020, MBCRO Transfers Team.